Go once again to the Materials dialogue box, View![]() Render
Render![]() Materials… from the pull-down menu. Select the material from the list on the left and click the button at the top of the right hand column. You now see the Modify Standard Material dialogue box, shown below.
Materials… from the pull-down menu. Select the material from the list on the left and click the button at the top of the right hand column. You now see the Modify Standard Material dialogue box, shown below.
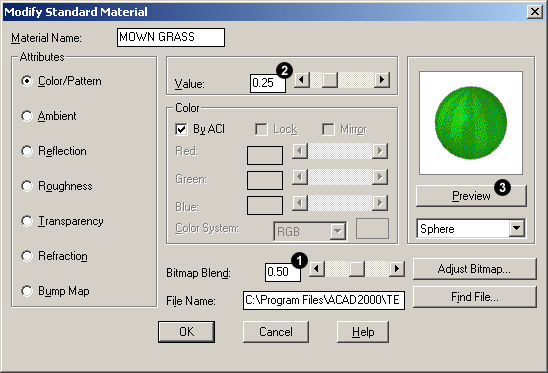
The brightness and the strength or contrast of the material can be adjusted using a combination of two parameters, "Bitmap Blend" and "Value". The way a bitmap material looks is a combination of two components, the bitmap itself and the colour of the object to which it is attached. The Bitmap Blend parameter determines how much of the bitmap or object colour are seen. By default, when you create a new material, AutoCAD sets the Bitmap Blend value to 1.00. This means that only the bitmap is seen and none of the object colour. Setting this value to 0.00 means that only the object colour is seen and none of the bitmap. Between these two values, varying proportions of both bitmap and object colour are seen. The Value parameter controls the brightness of the object colour. The default value of 0.70 gives the true object colour. A lower value causes the colour to darken and a higher value causes the colour to brighten. The Value parameter has absolutely no effect on the material when Bitmap Blend is set to 1.00 because none of the object colour can be seen. However, by adjusting the two values together, it is possible to get just the effect you want.
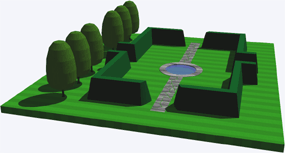
The settings shown in the illustration above result in the rendered image on the right. Again, this is another of those situations where you really need to play about with the parameters to get a feeling for them and to finish up with just the result you are looking for.
You can use the Preview to get a crude idea of how the changing values affect the material but you will need to render the model to see the results properly. So, when the preview looks about right, click the OK button to return to the Materials dialogue box, OK again to return to the command prompt and then do a final render.
 |
| Bitmap Blend = 0.0 |
 |
| Bitmap Blend = 0.5 |
 |
| Bitmap Blend = 1.0 |
More on Bitmap Blend
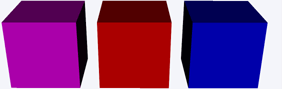
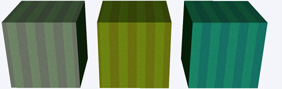
Bitmap Blend and the object colour can be used in combination to vary the way the rendered material appears. For example, the 3 cubes on the left have object colours of magenta, red and blue. Each cube also has the Grass material attached. The cubes on the top row have Bitmap Blend set to 0.0, so none of the bitmap is seen. The cubes in the middle row have a Bitmap Blend value of 0.5, so we see 50% of the object colour and 50% of the bitmap. The cubes on the bottom row have a Bitmap Blend value of 1.0, in this case, we see none of the object colour.
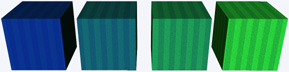
The four cubes below all have an object colour of blue. Each cube has the Grass material attached and the Bitmap Blend variable has been set (from left to right) to 0.2, 0.4, 0.6 and 0.8 respectively. You can clearly see the change from object colour to bitmap.
Bear in mind that once Bitmap Blend has been set to a value of less than 1.0, you can also use the Value variable to change the brightness of the object colour. Used in combination, these parameters give amazing control over the way a material looks when it is rendered. As usual, in order to achieve a good understanding of how these parameters affect the final result, you need to experiment.


Your comment here:
Post a Comment