The Wipeout Command

A Wipeout is an image type object. Most commonly it is used to "mask" part of a drawing for clarity. For example, you may want to add text to a complicated part of a drawing.

A Wipeout could be used to mask an area behind some text so that the text can easily be read, as in the example shown on the right. The Wipeout command can be used for 3 different operations.

Read more»

The Point Style Command

You can start the point style command from the keyboard by typing DDPTYPE or you can start it from the pull-down menu at FormatPoint Style… The command starts by displaying a dialogue box offering a number of options.

To change the point style, just pick the picture of the style you want and then click the "OK" button. You will need to use the Regen command, REGEN at the keyboard or ViewRegen from the pull-down to force any existing points in your drawing to display in the new style. Any new points created after the style has been set will automatically display in the new style.
Toolbar none
Pull-down FormatPoint Style…
Keyboard DDPTYPE

One interesting aspect of points is that their size can be set to an absolute value or relative to the screen size, expressed as a percentage. The default is for points to display relative to the screen size, which is very useful because it means that points will remain the same size, irrespective of zoom factor. This is particularly convenient when drawings become complex and the drawing process requires a lot of zooming in and out.

You can start the point style command from the keyboard by typing DDPTYPE or you can start it from the pull-down menu at FormatPoint Style… The command starts by displaying a dialogue box offering a number of options.

To change the point style, just pick the picture of the style you want and then click the "OK" button. You will need to use the Regen command, REGEN at the keyboard or ViewRegen from the pull-down to force any existing points in your drawing to display in the new style. Any new points created after the style has been set will automatically display in the new style.

Toolbar none
Pull-down FormatPoint Style…
Keyboard DDPTYPE

One interesting aspect of points is that their size can be set to an absolute value or relative to the screen size, expressed as a percentage. The default is for points to display relative to the screen size, which is very useful because it means that points will remain the same size, irrespective of zoom factor. This is particularly convenient when drawings become complex and the drawing process requires a lot of zooming in and out.

Read more»

Making a Layer the Current Layer on Autocad 2011

Making a Layer the Current Layer on Autocad 2011

Once you have created some layers you will want to start using them. As indicated above, you can only draw on one layer at a time. In order to draw on a particular layer you must first make it the current layer. As usual with AutoCAD there are a number of alternatives. You could, for example, use the Layer command, Layer... from the Format pull-down or Layers from the Object Properties toolbar. As you have seen previously, this command brings up the Layer & Linetype Properties dialogue box. To set the current layer, select a layer name from the list and then click on the "Current" button and then click the "OK" button to finish. The selected layer is now the current layer and it's properties are displayed on the Object Properties toolbar.
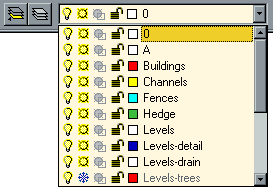
Layer Control

Making a Layer the Current Layer on Autocad 2011

Once you have created some layers you will want to start using them. As indicated above, you can only draw on one layer at a time. In order to draw on a particular layer you must first make it the current layer. As usual with AutoCAD there are a number of alternatives. You could, for example, use the Layer command, Layer... from the Format pull-down or Layers from the Object Properties toolbar. As you have seen previously, this command brings up the Layer & Linetype Properties dialogue box. To set the current layer, select a layer name from the list and then click on the "Current" button and then click the "OK" button to finish. The selected layer is now the current layer and it's properties are displayed on the Object Properties toolbar.

Layer Control

Read more»